
Last Updated on
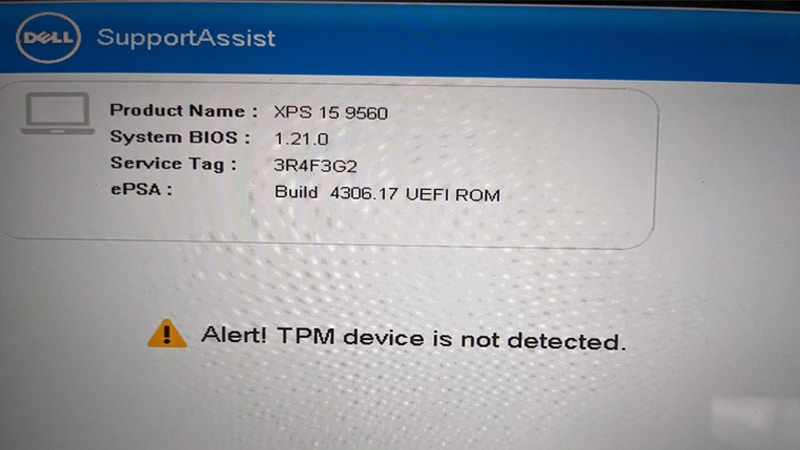
When powering up your Dell laptop, you have encountered an error message that reads:
“Alert! TPM device is not detected.”
This can be pretty scary but once you understand what it is and how you can solve this problem, you will feel a lot more at ease. So, if you ever encounter this error message, check out the information below on how you can tackle it and solve this problem with ease.
What Is TPM?
TPM is short for Trusted Platform Module is a chip in your laptop’s motherboard that is used to carry out cryptographic operations in your Dell laptop’s systems. It is used to secure the hardware of your laptop through integrated cryptographic keys – so basically, it helps protect your laptop from security issues and malware.
Different computer systems use it to authorize and authenticate files and data. This error message crops up when your TPM processes, and thus part of your laptop’s security, are compromised.
BitLocker functionalities that are used by Windows can be behind this, but BitLocker is also very important in its own right and disabling it can lead to other issues with your laptop. So, while the simple fix may be to just disable BitLocker – it’s not the best way to go.
So, how else can you solve this problem? Let’s check out some methods that you can try.
Step
Disconnecting Your Laptop’s Battery
Our first method involves disconnecting your laptop’s battery by removing it completely. Apparently, a lot of Dell laptop users who have suffered from this issue found that just popping out the battery fixed it and the board reset once it was plugged back in.
To do this, jump flip over your laptop and follow the arrow instructions to safely remove the battery. Each Dell laptop is different in make and model, so you will have to identify the battery on your individual laptop and go from there.
Once it has been removed, just sit and wait a few seconds. The power to your laptop should have been cut off and the fans will have shut off.
After a while, plug the battery back in and start up your Dell laptop once again. Most people who tried this method reported that they did not experience the error again but if it persists, there is still another method you can try out.
Step
Update Your Laptop’s Firmware
If removing the laptop’s battery has not helped the situation, then it could be that your laptop’s firmware is the cause of the problem. The best way to solve this is by updating your laptop’s firmware with the latest installation from Dell themselves.
However, because each laptop is different and has its own unique firmware, you will have to research that yourself. Look up the model of your laptop and its product ID, download the updates for the firmware your laptop uses and install them.
The best website for this is Dell’s Drivers and Downloads.
There is a section that will help you find the specific driver for your laptop so you can download it easily. Just type in your laptop’s model or product ID, and Dell will help you out.

One important utility software you can use to help you with this is Dell SupportAssistant. It works by detecting any outdated drivers on your laptop’s system, and updating them for you.
This will keep your laptop’s firmware updated at all times. This is an option a lot of people go for if they are not sure about the make or product ID of their Dell laptop.
Once your firmware is updated, all you have to do is restart your Dell laptop and hopefully, everything will be fixed.
Reset BIOS Defaults
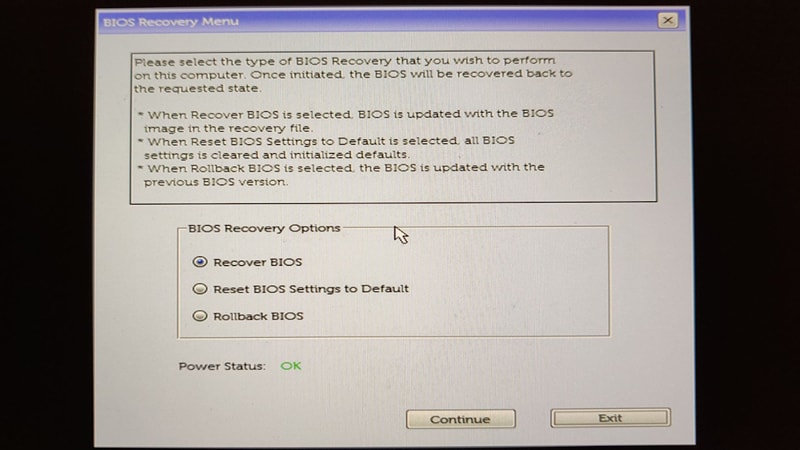
If your laptop’s firmware is all updated and you are still having the same error message, then you will have to reset your BIOS defaults. It could be because you updated the firmware wrong and need to reset it back to its original state, or this method could work on its own and help your laptop recognize your TPM chip.
Start out by powering off your laptop and making sure that it is not plugged into any power source. Hold down the ESC and CTRL button on your keyboard and then plug in the power cable and press the power button. Once your laptop is booted up, you can release the ESC and CTRL keys.
You will be taken to your laptop’s BIOS page. Here, you will be given three BIOS Recovery Options. You will need to select the Rollback BIOS option to reset your laptop’s BIOS defaults and restore it to its previous state.
Boot up your laptop again and hopefully, the error message will be gone.
Conclusion
And that is it!
After trying these three methods, you should not no longer have that horrible error message popping up every time you boot up your Dell laptop.
If you do, then it’s time to take it to Dell’s Support Technicians to see what the root cause of the problem is and get it fixed.