
Last Updated on
Margins are the space between lines or columns in a document, and they are useful for providing a visual separation between text blocks. The default margin settings in Microsoft Word are 0.5 inches from the left and top edges of the page – this means that each line of text has a half-inch of white space around it.
While this tends to work well for a number of documents, it will not be the best layout for every project, and so learning to change your margins is important. Fortunately, this is a simple and painless process – read on for all you need to know.
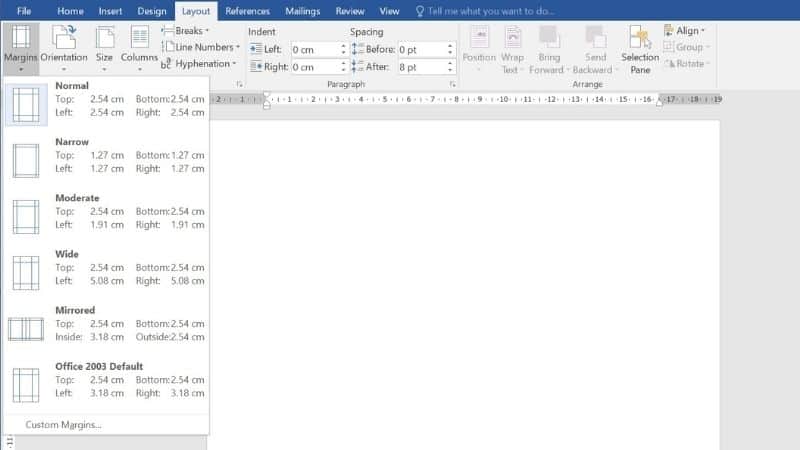
Choose Page Margins Using Predefined Settings
Below are the steps on how to change margins in a word using predifined settings:
Step
Page Setup
The easiest way to set up the margins for your document is by selecting the “Page Setup” option from the File menu.
This brings up the Page Setup dialog box
Step
Margins
Click the “Margins” tab at the bottom of the window. You can see that there are two options here:
“Top,” which sets the distance between the top edge of the paper and the top edge of the first line of text; and “Bottom,” which sets the distance from the bottom edge of the paper to the bottom edge of the last line of text.
Adjusting and changing these will allow you to adjust your margins, and this is useful if you would like more space at the top or bottom or a more customized appearance.
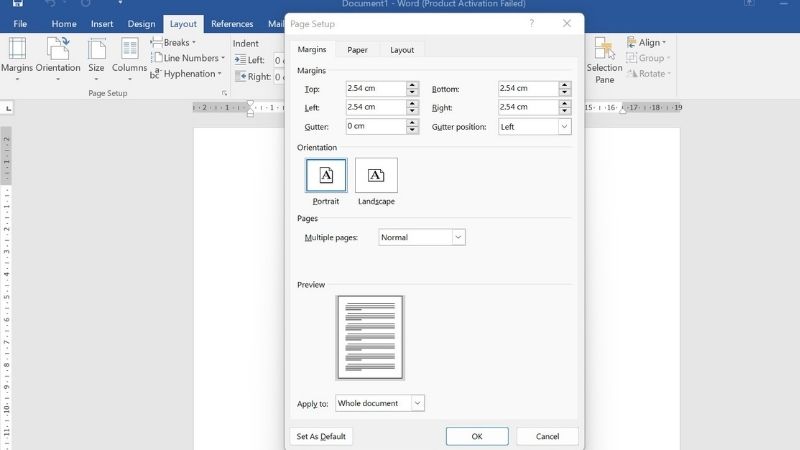
Create Custom Page Margin Settings
Below are the steps on how to create custom page margin settings:
Step
Page Layout
If you want to create custom margin settings for your document, then you can head to Page Layout, and then launch Page Setup.
You will see options for Top, Left, Bottom, and Right, and you can enter the size of your preferred new margins in inches – this can be a whole number or a decimal.
Step
Apply To
In the “Apply To” menu, select a location – you can choose to apply these margins to the whole document, or just a single part of the document.
You can also choose to apply the margins heading forward from a certain point.
Should You Adjust Margins With The Ruler Marker?
You may have noticed that when you use the ruler tool to move the cursor across the page, it changes color as it gets closer to the right side of the page.
This is because the ruler is actually measuring the distance from the current position of the cursor to the right edge of the page.
If you wish to measure the distance from the left edge of the page to the right edge, then simply hold down the Ctrl key while moving the mouse over the right edge.
This will offer you the measurements and dimensions, but will not have any tangible or practical effects on the margin in your document.
Essentially, using this method will only indent your text – it will not actually adjust and alter the margin in your document. To achieve this, you will need to either adjust the measurements of a pre-set margin or create your own custom margins, as described above.
This will set the margins for the whole document, or for a specific section that you have allocated.
Final Thoughts
The type of project that you are working on can have a large impact on the margins that you need for each page, and for the document as a whole.
By learning how to adjust your margins, you can take greater control of your document and final text, creating the changes that you need.