
Last Updated on
It’s possible to print address labels from Microsoft Excel by using the “mail merge” feature in Microsoft Word. By using our handy guide below, you’ll be able to easily and quickly print address labels.
How To Print Address Labels From Excel
Below are the steps on how to print address labels from excel.
Step
Making Your Microsoft Excel Worksheet
To begin with, you’ll need to make your Excel Worksheet filled with the address details. To do this, you’ll need to create columns for each bit of address information.
For example, you might want a “Title” column (Mr, Mrs, etc.), before the essential separate first name and last name columns. After those details, you’ll need the address itself, with columns for “Street Address”, “City”, “State”, and the person’s “ZIP Code”.
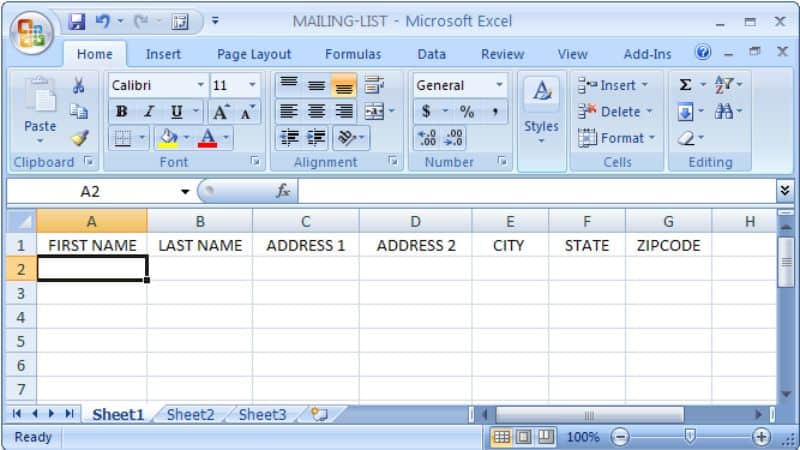
To create these columns, click on the first cell of every column and type the aforementioned headings in.
Next, fill out the cells underneath each heading with the address details for the labels that you’re making. Fill out each individual case by going across each row, filling each column. When you move onto a new person, enter it into the row below the last.
When you’ve filled out all the addresses that you want, save the Worksheet. Make sure that each detail is correct before you move past this step – you don’t want your addresses to be inaccurate and your packages to get lost in the mail.
Step
Establishing Labels In Microsoft Word
With your Worksheet saved, it’s time to open Microsoft Word, where you’ll select the types and sizes of your labels.
First, open a new Word document. At the top of the screen, select the “Mailings” option – it’s about halfway across the row. From the options that appear below, select the “Start mail merge” box. From the drop-down that opens, select “Labels…”
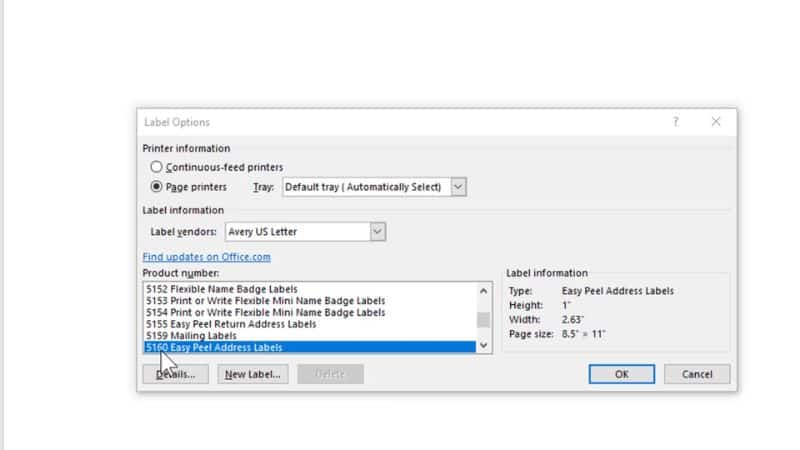
This will open up a “Label Options” window. From here, you can pick a brand by clicking the “Label vendors” drop-down, as well picking the “Product number” below (which you can get from the label package).
Alternatively, you can click the “New Label” button at the bottom and create your own label made with your own dimensions. When you are finished, hit “OK”.
Step
Connecting Your Worksheet To Your Labels
Now you need to connect the Word document you just made to your Worksheet from before.
First, open up Word and select “File” at the top right. From the side panel that opens, select “Options”.
This will open up a new window. Select “Advanced”, then scroll to the “General” subheading on the right. Ensure that the “Confirm file format conversion on open” box is ticked. Hit “OK”.
Then click “Mailings” at the top, then “Select Recipients”. From the drop-down, select “Use an Existing List…”
From the options, select your previous Excel Worksheet. Click “OK”, then pick the table with your list in, and hit “OK” again.
Step
Mail Merge
Finally, click on your first label, then go to “Mailings”. There, select “Address Block”. Find the button that says “Match Fields…” on the bottom right, ensure your headings are in the correct places, and hit “OK” twice.
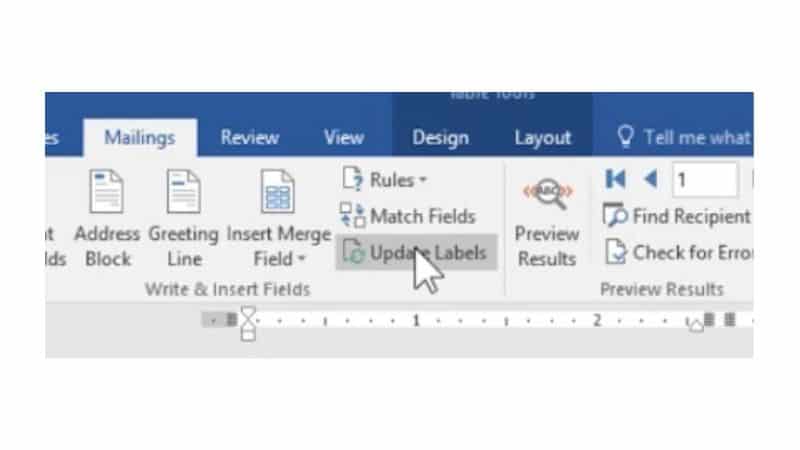
Go to “Mailings” and find “Update Labels”. With the documents megred, click “Finish & Merge” on the right of the “Mailings” options. Select “All” and hit “OK”, whereupon your new document will open.
Final Thoughts
By following our guide carefully, you’ll be able to print address labels from Excel in no time, with the help of Word’s mail merge feature.